Wednesday, July 25, 2012

Night Photography

I've always loved night photography. The rich shadows, and saturated colors always drew my eye. When I first started shooting night shots, we still used film. I had to plan out my shots, and usually did several exposures at different "shutter speeds" to see what would come out best. I shot this house sometime around 1997. The house was in Hollywood, and it was an overcast night. The city's lights gave the cloud's the orange glow of Sodium Vapor lamps, and the yellow from the homes incandescent interior lights really struck a chord in me. I believe I shot this on a 50mm from across the street, and I did 3 separate exposures. (45 sec, 1 min, and 1:15). I then trusted the lab to get a good print out of one of those.

With digital, there is much less "guess work". Most camera's "auto" mode will do long exposure whether you want them to or not. The camera is designed to get an exposure, and if there isn't enough light, it will hold the shutter open until it has it. blurring anything that moves in the frame, or the whole image if the camera moves. But what do you do when you want a good long exposure? Here are some tips to help you get that night shot, and make it look good.


Know your camera settings. If your camera is equipped with an "aperture priority mode", use that. Set your ISO low (200 should be fine), and close down that iris to try and get as much depth of field as possible. The camera should figure out the shutter speed automatically, but if it doesn't, set to manual mode, and try 30 seconds. If the picture is black, you need a longer exposure, if it's white, you need a shorter one.

Eliminate shake. Mount the camera. Use a tripod if you have one, set it down if you don't. Your heartbeat will shake the camera, and depending on how long the exposure is, and how long your lens is, that shake will probably blur your image. Use a remote triggering device if you can, or use the camera's timer to insure the act of pushing down on the shutter button doesn't shake the camera.

Use a wide lens. This isn't terribly important, but a wide lens will minimize the effects of any camera shake. The longer the lens, the more obvious any movement is. If the lens is zoomed in twice as tight as what your eyes see, any movement of the camera will be twice as pronounced. A wider lens will also give you a much wider depth of field helping to achieve a good focus (which can be somewhat difficult shooting wide open and zoomed in at night)

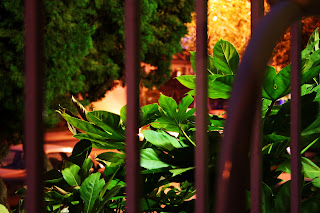
Finally, look for light sources. Window lights, street lights, and building lights all have different colors to them that are a bit subtle for most eyes to notice, but the camera will see them, and they will add a special color palette not often seen in daylight photos. If all you have is moonlight, that will work also, but your images may just look like daytime shots if you expose for to long.
For the motion picture crowd, unless you are doing time lapse, you can't shoot 30 fps and still do a 30 sec exposure. Your best bet will be to use the fastest lens you can get, and then test your camera with different f-stops and ISO settings. Compare different ISO settings and f-stops until you find an acceptable depth of field, and noise ratio. Use a wide, fast lens, and you should still get a good image. Remeber, the whole image does not need to be properly exposed. As long as one area is right, the rest of the image (even your subject) can be a stop or two under exposed.
*Research Tip: If you would like to look at some incredible examples of early 20th century B&W night photos, I highly recommend looking at Brassai: Paris by Night This book really captures a moment in history, as all of our photos together are capturing today.


Wednesday, July 18, 2012

Photo Composition Techniques: Some rules for you to break


I’ve never been one to follow rules. I’ve always felt photography was more about feeling then it was about formula. Even in the dark room, I never use timers, thermometers, or any of that fancy science stuff. Photography is too organic for that. However, looking back at some of my work, I realize that I did “follow” the rules more then I thought. Why, because the rules make sense. They are aesthetically pleasing, and in that split second when you are trying to grab that shot, having the rules in the corner of your brain means one less thing to think about. Does this mean you should follow them all the time? Of course not. Is your picture wrong or bad if you don’t follow them? Not at all. So what good are they? Simple, the “rules” are things to remember to give your photo that... feel. So love it or hate it, here is my photocomposition tutorial.

The Rule Of Thirds:


Ah the rule of thirds. Look at an image, and divide it into 9 even blocks using 2 evenly spaced vertical lines, and 2 evenly spaced horizontal lines. Then try and line up your scene to these lines. The important things will work best on the intersection of these lines. Eyes, text, product, whatever it is you want the user to focus on, put it on those intersections. In the photo on the right, of the Station fire in Los Angeles, I sis not use any of the intersecting points, but the photo is clearly divided into thirds.


Off With Their Head!

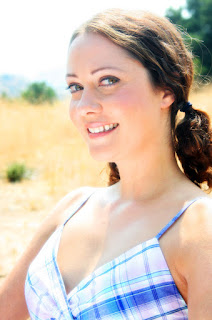
When photographing people, or animals, pay attention to the bodies natural joints. Avoid cropping your pictures at the neck, elbow, waist, or knees. Instead, try to crop at places halfway between the joints. Cutting off at a bend point gives a severed feel to the image. While on the subject of body positioning, another good photo composition tip is to leave nose room. If your subject is looking from one side of the frame to the other, always leave room for them to look. Have more in the direction they are looking then behind them. In this photo, the subject (model Regina Bailey) looks comfortable, and natural. There is plenty of breathing room in front of her face, and the photo cuts off midway between her neck and elbows. As a general rule of thumb, a close-up is head and shoulders, a medium is from head to just above the waist, a "cowboy" shot is head to mid thigh, and a wide shot gets the whole body.


Patterns.


Pattern, symmetry, repetition, and lines that direct your viewers’ eye. These are all things that can be found in subtleties of landscapes (both rural and urban.) Utilize these things. Show your viewer the winding road ahead, or point them at the woman on the balcony. Vertical lines show strength and power, while horizontal lines convey serenity. Diagonal lines show action, and curves have a serene sensuality to them. Converging lines have a sense of contemplation and the unknown.

Depth of Field

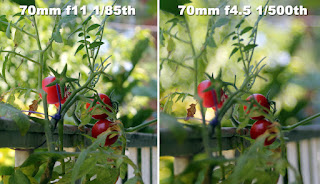
Depth of field is what is perceived to be in focus in your image. Although a camera can only be focused on one point in space at a time, a wider depth of field will make more of the picture appear to be in focus. The size of your image plane (piece of film, or digital sensor) plays a part in depth of field, with a smaller image plane providing a wider depth of field and a larger image plane providing a narrower one. A wider angle lens will also increase the depth of field as will a smaller aperture. Throwing things out of focus is a great way to make sure your viewer is looking at what you want them to look at. So if you want that background to go out of focus, zoom in and open your iris. You can raise up your shutter speed to compensate for the wider aperture or us Neutral Density filters)


I’m sure some people will say these aren’t important, and some will say I’m leaving out the most important things. Truthfully, I don’t think about rules. I keep them in a corner of my brain, and when I raise the camera to my eye to frame a shot, they come out like a reflex. The camera raises or lowers to line up the natural elements of the scenes, I zoom in or out a bit, or step on way or the other. And these elements fall in line. It is what makes the image pleasing, and as long as you look through your viewfinder and try to find the most pleasing angle, and try to tell a story in you photograph, you will find that these rules will have applied themselves. Photography is organic, and when all the elements fall together, it is a priceless tool to tell a story.

Wednesday, July 11, 2012

Shoot The Moon!

Have you ever shot a picture of the moon, and where disappointed to find that your photograph was of a blown out orb hanging in the sky? This is a phenomena that befuddles many photographers. The solution is really common sense. The problem is simple. Your camera is set for the lighting conditions of where you are at, not the lighting conditions of your object. 
When we look at the moon, we are seeing the part of the moon that is lit by the sun. Although it is night time where you are taking the picture, it is broad daylight on the moon (at least the part that you can see).
The Above photo was shot with an ISO rating of 200, at a 1/125th sec shutter speed, and an iris set to f5.6. That is right, the camera is set to take a picture in daylight conditions. (I probably could have cranked that down to an f8). There is some adjusting to do on a photo by photo basis, When the moon is full, we are looking at it being directly lit. When it is a "new" moon, the side directly being lit by the sun faces away from us. That is why we can not see the new moon. The phase between show us a part of the sunlit side, and a part of the shaded side, and the "dawn/dusk" section in between.. The above photo was taken in Florida. It was in a small town, in a residential community. The clear sky, and lack of smog made the moon very clear. 
 The photo to the right, was taken with the exact same setting, and same lens (Canon 70-300mm zoom).  However, this was taken in Los Angeles's beautiful San Fernando Valley. The angle of the sun to the moon made the moon darker, and the smog blurred the details a lot. This is why it is important to review your photo, and make adjustments. Is it a bit blown out? Close the iris a stop, or speed up the shutter speed. To dark? open it up. Go with a slower shutter speed, or a faster ISO. Is it blurry? Open up the iris and go with a faster shutter speed. Still blurry? go someplace without as much smog.
Below is a diagram of the moon phases using a ball and a 100w Fresnel to simulate the sun and the moon. The camera placement represents the earth relative to the sun and moon. A crescent moon is actually a 3/4 edge light. a half moon is a side light, and a full moon is a front light.
So remember, If you want a good photograph of the moon, get a long lens, take your camera off of auto, and set the manual settings as if you were shooting in the middle of the afternoon. Snap some shots, review them, and adjust as necessary. Also, if you live in a place with a lot of smog (like Los Angeles), drive out of town a couple hours. Enjoy some fresh air. it will do you some good. Now let's all go shoot the moon!